Showing posts with label students. Show all posts

Monday, April 20, 2020

Awesome Augmented Reality with EyeJack


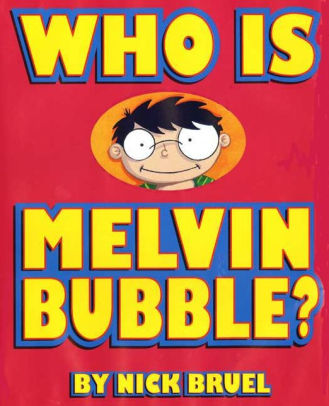
Shirley Rossman, 4th Grade Teacher at West Holt Elementary, leads her students in a creative autobiographical writing project each year. Based on the book "Who is Melvin Bubble?" by Nick Bruel, students engage in perspective writing, as each page describes themself through the eyes of a friend or family member. The final page is all about the student from the point of view of the student themself, and this is where we collaborated for an augmented reality twist to this project. 

  • Students wrote their drafts on paper and collected digital images of the family members and friends who were "telling the story."
  • I created a template file in Keynote that students could personalize with their content and eventually export as pdf for self-publishing/printing. 
  • Using the camera on an iPad, students took pictures of each of their handwritten final draft pages and added them to the appropriate placeholders in the Keynote template.
  • Each photo of the "narrator" of the page was opened in the Clips app, a cartoon filter was added, saved to camera roll, and then Airdropped to the students to add to their book file. 
  • We took photos of the students themself (one close up of their face for the cover and a full-body waving shot for the first and last pages) and used the Clips app to "cartoonize" and Airdrop as well. 
  • Using the free voice memos app each student recorded an audio narration of their final page of text (explaining who they are from their own point of view). 


Using Keynote again, students created an animation for their final page. The trigger image was their waving photo. It was added to a slide and then that slide was duplicated. Slide 1 will become your trigger image (export as png with transparent background) and Slide 2 is where you lock the image to the background and then create your animation around it. Then shapes, drawings, images, etc. were added, formatted, and then animated with motion paths and effects. Timings could be set to automatic, but students were encouraged to aim for about 30 seconds of total animation length (to match the maximum audio recording duration). When complete, the background image was unlocked and deleted, the slide background was set to transparent, and the 2nd slide was exported as a gif. 

I used the EyeJack Creator app (free download for Mac) to assemble each student's augmented reality experience for their final page. 
  1. Add trigger image (exported png from 1st Keynote slide)
  2. Upload animated gif (exported from 2nd Keynote slide)
  3. Add audio (mp3 from Voice Memos)
The EyeJack Creator app generates a QR code which is also saved and placed on the page in each students' Keynote "book."

Now, when people read their book, they use the free EyeJack app on their phone to scan that QR code and then hover over the trigger image on the page to see the animated come to life in AR. 

Each student's finished Keynote book was exported as a pdf. 
I used the softcover Tradebook option (Economy, color) on blurb.com to order a printed copy for each student and their family. (Approximately $5 each when all was said and done.)


In addition, for fun, I made a version for Mrs. Rossman and myself that had just the final page from every student's book into a class compilation of Augmented Reality student "About Me" animations. 


Monday, January 6, 2020

ESU 8 App Design Challenge Day

On December 10, 2019, ten teams of middle school students from ESU 8 schools put their minds to work designing app prototypes for community challenges.


We started the day with a kick-off on the power of learning to code. 

Every student accessed an App Design Journal (in Keynote) and began customizing their journal to document their journey. 

We utilized Challenge Based Learning as a framework for our day's learning. An overarching challenge "Use app design to solve a community challenge" was presented.


Then three community experts presented Big Ideas & Community Challenges for the student teams to ponder. 


Teams each decided on which Big Idea/Challenge they would take on and immediately got busy investigating through guiding questions and activities.


One of the coolest things learned was how easy it can be to create an app prototype in Keynote. After watching this app developer share his WWDC presentation, teams quickly started creating app prototype design plans, storyboards, and hyperlinked Keynote slides to showcase the main features of their thinking.


The day was culminated with an App Showcase where teams presented their app prototype in rotations sharing a 3 minute pitch and time for feedback from visitors.  During round 1 half of the teams presented three different times, while the other half of the teams served as feedback givers. Then in round 2 the roles were reversed. ESU 8 professionals joined the app showcase and were impressed by the ideas and quick turnaround on product by the student teams!


Teachers and students alike were anxious to get back to their schools and explore coding and app design with even more learners. 


A snapshot of an exciting day at ESU 8!


Tuesday, October 29, 2019

2019 DigCit Week - Student Creations

Students from ESU 8 who attended this year's Nebraska Digital Citizenship Symposium created positive campaigns to take back to their school and community for DigCitWeek 2019.

O'Neill High School

8th grade students from O'Neill High School created the following video PSAs to share with students at both the Elementary and High School buildings.


In addition, this O'Neill High School Digital Citizenship team appeared on Eagle Eye Broadcasting- Daily Announcements during DigCit Week and shared their message. 


West Holt High School

7th grade students from West Holt created a social media campaign with graphics shared on their school twitter channel all week long. 


Ewing Public School

6th and 7th grade students from Ewing Public School organized a TikTok challenge for Digital Citizenship Week. 


Thank you, ESU 8 students, for showing all of us how we can each "Be the One" to make a difference online. 

Sunday, October 6, 2019

Animal Adaptations Infographics

For this year's ESU 8 Elementary Science Olympiad, activities were centered around a phenomenon. Students were scientists as they explored and experienced topics with connections to that phenomenon.

During my rotation we learned about animal adaptations and how they help animals survive. Each pair of students created an infographic in Keynote on iPad to visually share their scientific knowledge with others.

To replicate in your classroom, I recommend starting with the Everyone Can Create: Drawing guide book from Apple Books. Chapter 9 is all about infographics and contains solid examples as well as planning considerations.
Everyone Can Create Drawing
We also examined this Snowy Owl infographic example to look for critical features of an infographic as referenced in the Everyone Can Create chapter.

Next student pairs each chose an animal that interested them and researched it on World Book Online Student Edition. ESU 8 provides access to this valuable resource to all our schools and it tremendously helped with efficient and responsible research for this age group of students. Older learners could use Advanced and younger grades the Kids Edition of World Book Online. We discussed how to cite and credit the article for their researched and then navigated to the media tab to choose the image to be the center piece of their infographic. Students copied their animal's image and then opened the Keynote app to begin to create.

Prior to students arriving, I used Apple Classroom to distribute a Keynote file where I had created a custom theme with different biome backgrounds set to 50% opacity and locked in the background of the slide design options. This was mostly to maximize time for students to create.
(To make your own version simply create a new Keynote, View > Edit Master Slides, delete the existing masters other than the blank one, duplicate that and add a different background image to each, name each slide master and choose 'Done'.)

Now, all students needed to do was add a new slide (blue + on bottom left) and choose the biome that most closely matched their chosen animal. They pasted their image on the slide, resized and some used instant alpha to clean up the background. (Note: If students had access to Apple Pencil, I would encourage them to trace, color, and delete the original image in order to have a truly personalized look for the visual focus of their infographic.)


Using my example of a deer and its adaptations that I created below, we continued to go back and forth (or use Split Screen view on the iPad) between World Book Web and Keynote in order to add the following components:

  • Title
  • Name of biome
  • Map of where it lives
  • at least 3 adaptations that help it survive


Keynote skills the students learned included:
  • Adding and editing text
  • Inserting drawings
  • Using shapes, callouts, and connectors
  • Recording audio (for a few early finishers)
Also during this fast-paced 45 minute lesson we discussed critical design elements including, font, color, layout (proximity & space), and contrast. 


After all the student groups had rotated through, it was easy to collect the Keynote files through Apple Classroom and send the completed infographics back to their teachers. You can view the students' creativity and scientific knowledge in this online gallery.

Monday, September 3, 2018

Students Authoring Books with Pages


Every year on September 8, International Literacy Day is celebrated. In conjunction with this year's celebration, AppleEDU has launched a #PagesBookChallenge. The challenge is simple. Create a digital book with your students in Apple's Pages app (free creation app for Mac or iPad). Then, simply tweet a short synopsis of the book along with its cover and tag #PagesBookChallenge.


To encourage all educators to participate here a series of short tips and recommendations for creating digital books with Pages.

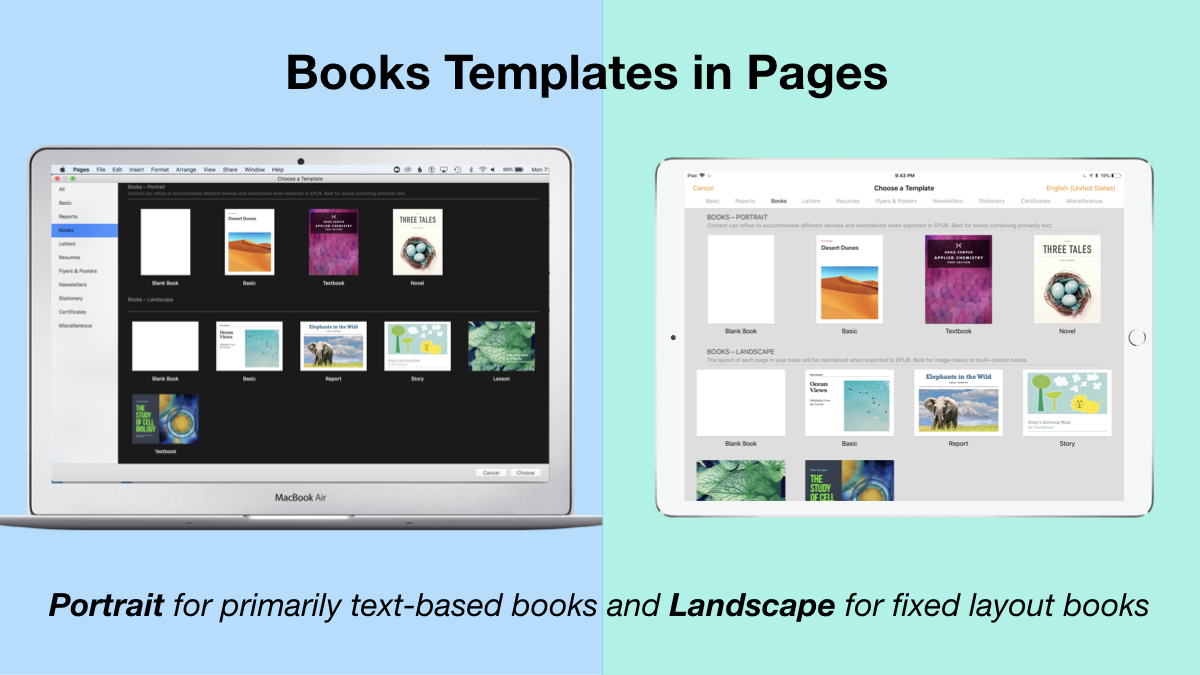
1. Begin a new Pages project using the Books templates.

Tip: Use Portrait templates for primarily text-based books (so that the reader can resize the text and the pages will adjust accordingly) and Landscape for fixed layout books (where you control the exact design and layout of the pages and the reader cannot adjust).

2. Author and Edit as you normally would in the Pages app. 

The beauty of the iWork suite, in my opinion, is its simplicity and consistency across apps. Unleash your creativity!

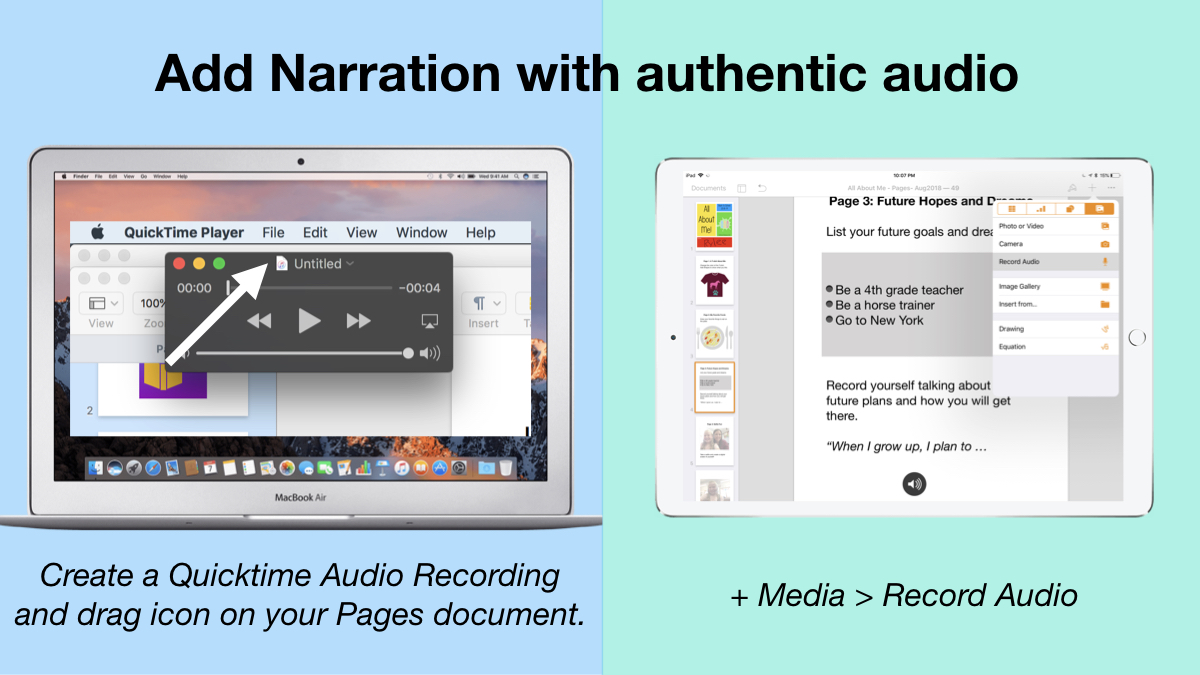
3. Add narration with authentic audio

On Mac: Create a Quicktime Audio Recording and drag icon next to filename onto your Pages document.
On iPad: Tap the +, choose the Media tab, and Record Audio, then add to page.

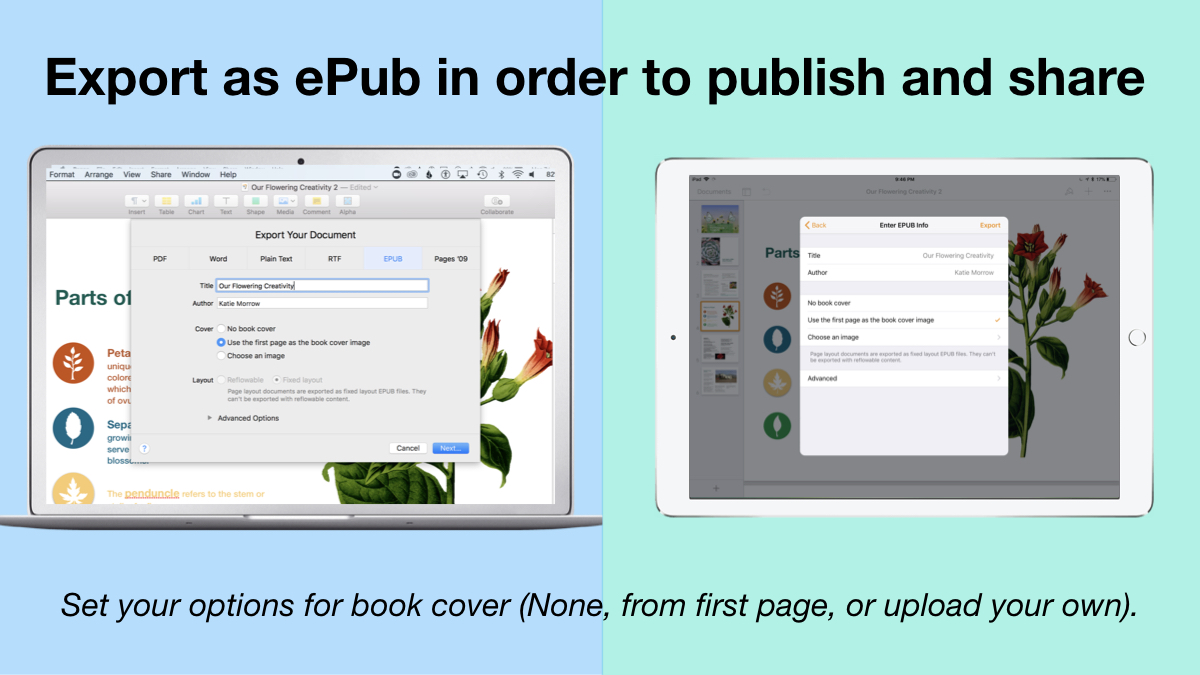
4. Export as ePub for Publishing and Sharing.

Title your book and name the author. Set your options for book cover: (None, from first page, or upload your own).
There you have it! Anyone can create a book with Pages. 


 Student books authored in Pages by Mrs. Troester's English 8 class, Spring 2018. (Science "Explainer" books for younger learners)

As educators the possibilities are endless when authoring books with Pages. To help learners experience authentic authoring, encourage them to work through all stages of the writing process. Here is a 60 second reminder of how to do so within the Apple ecosystem.


Finally, teachers can use Pages templates to help students focus more on the content of their books, and less on the the design of the pages. Whether for professional learning experiences, class books where every student authors a piece, or even shorter individual writing projects, simply create a Pages book as a starting template. Share the Pages document as a starting point and allow the learners to customize the content. Be sure to take advantage of the following features:

Media placeholders

Add image gallery placeholders from the Media button. This is a preset placeholder for the author to add an entire gallery of images.

Add text boxes and utilize Paragraph Styles

Text boxes are automatically ready as placeholders. Simply change the paragraph style and/or formatting.

Build your own photo/video placeholder

Add an image (or screenshot). Select the image and choose:
On Mac: Format > Advanced > Define as Media Placeholder

Add pages as desired and distribute to all your budding authors.  

I cannot WAIT to see what creative ideas you and your students have when creating books in Pages!