To bring to life first grade Social Studies learning, this class created an alphabet book based on the "Little House on the Prairie" series and Westward expansion topics.
First, Mrs. Willis and her students brainstormed topic options for each of the letters of the alphabet, then assigned to her class.
Next students researched and wrote their "stories," drawing an accompanying picture on paper.
I shared an ABC book template page via Apple Classroom and worked with the students to publish their work in Pages. Many examples of combining pencil and paper artwork with digital artwork were experimented with.
Students rotated through some "finishing stations" where they recorded audio with Mrs. Willis or were photographed in a pioneer costume.
Finally the pages were submitted to me via Apple Classroom so that I could assemble them in a class alphabet book.
Now published on the Apple Books Store, you can enjoy it here:
Every year on September 8, International Literacy Day is celebrated. In conjunction with this year's celebration, AppleEDU has launched a #PagesBookChallenge. The challenge is simple. Create a digital book with your students in Apple's Pages app (free creation app for Mac or iPad). Then, simply tweet a short synopsis of the book along with its cover and tag #PagesBookChallenge.
To encourage all educators to participate here a series of short tips and recommendations for creating digital books with Pages.
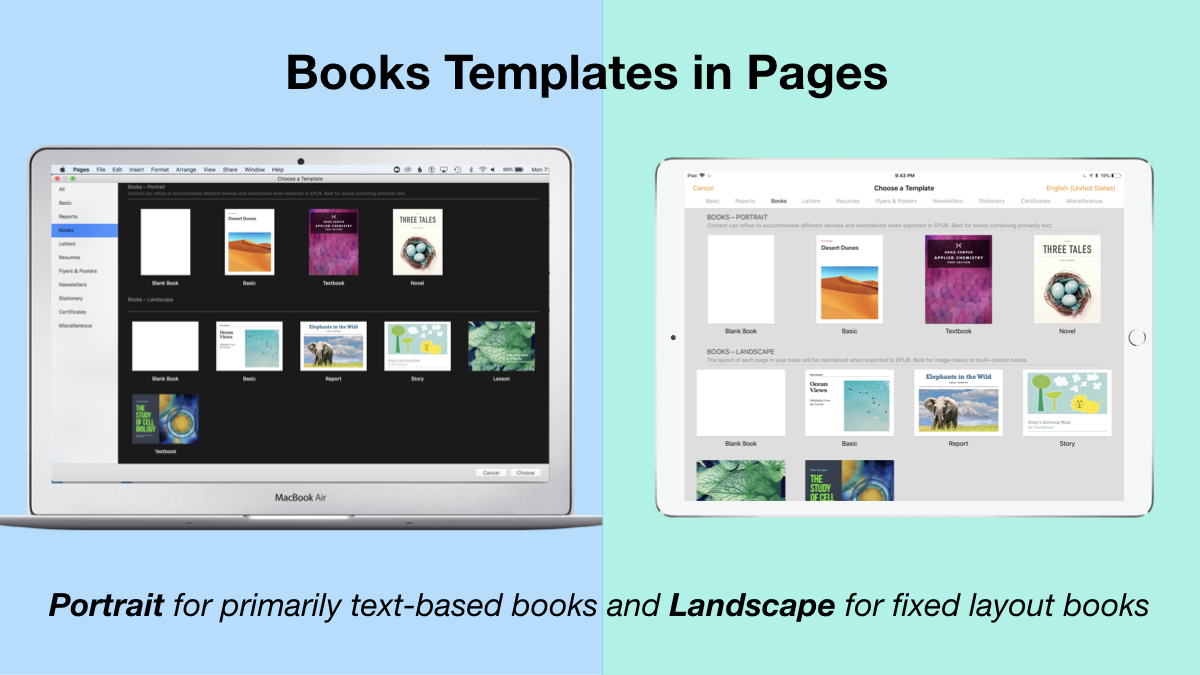
1. Begin a new Pages project using the Books templates.
Tip: Use Portrait templates for primarily text-based books (so that the reader can resize the text and the pages will adjust accordingly) and Landscape for fixed layout books (where you control the exact design and layout of the pages and the reader cannot adjust).
2. Author and Edit as you normally would in the Pages app.
The beauty of the iWork suite, in my opinion, is its simplicity and consistency across apps. Unleash your creativity!
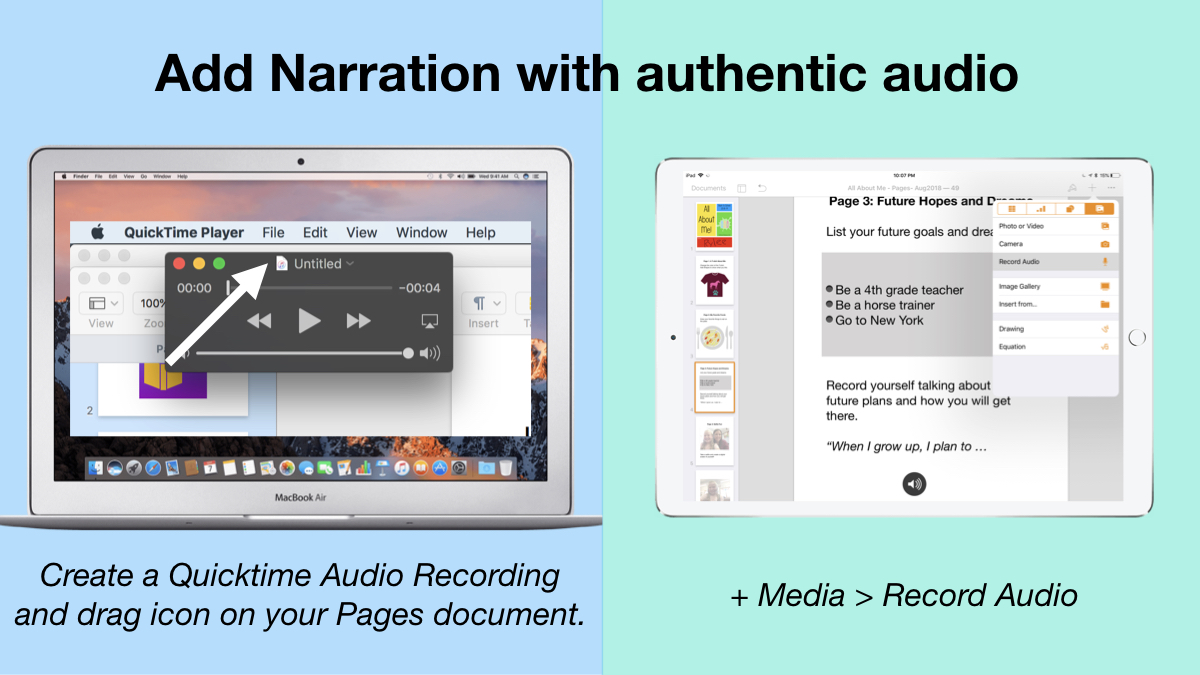
3. Add narration with authentic audio
On Mac: Create a Quicktime Audio Recording and drag icon next to filename onto your Pages document. On iPad: Tap the +, choose the Media tab, and Record Audio, then add to page.
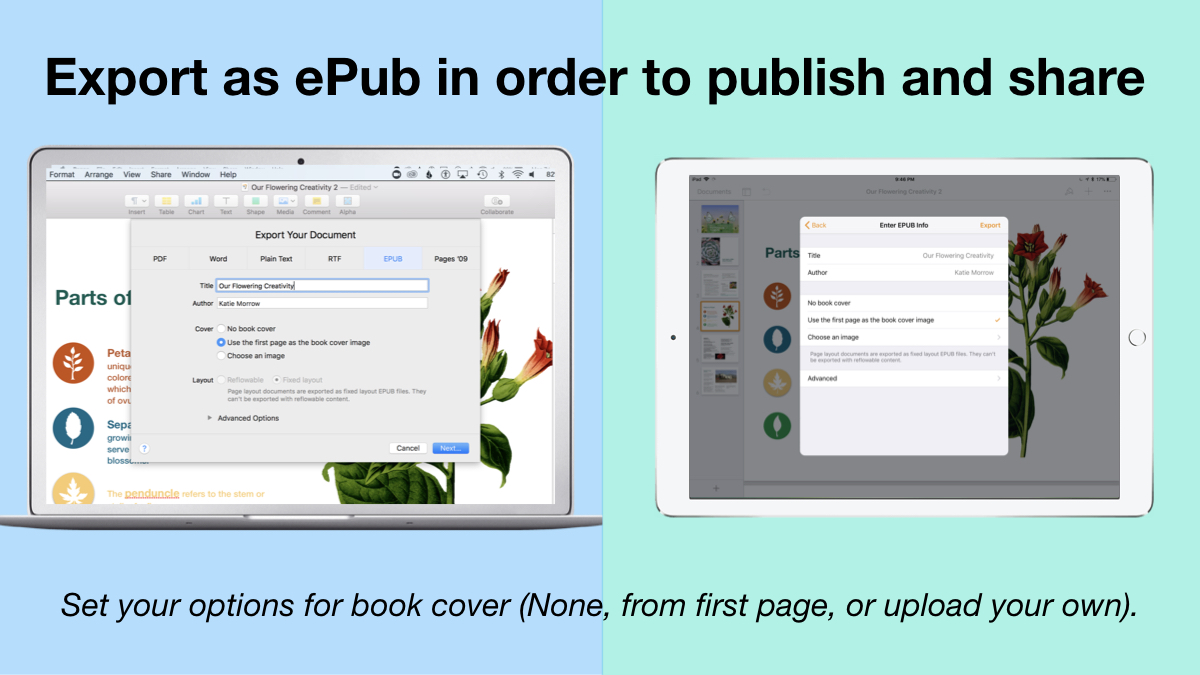
4. Export as ePub for Publishing and Sharing.
Title your book and name the author. Set your options for book cover: (None, from first page, or upload your own).
There you have it! Anyone can create a book with Pages.
Student books authored in Pages by Mrs. Troester's English 8 class, Spring 2018. (Science "Explainer" books for younger learners)
As educators the possibilities are endless when authoring books with Pages. To help learners experience authentic authoring, encourage them to work through all stages of the writing process. Here is a 60 second reminder of how to do so within the Apple ecosystem.
Finally, teachers can use Pages templates to help students focus more on the content of their books, and less on the the design of the pages. Whether for professional learning experiences, class books where every student authors a piece, or even shorter individual writing projects, simply create a Pages book as a starting template. Share the Pages document as a starting point and allow the learners to customize the content. Be sure to take advantage of the following features:
Media placeholders
Add image gallery placeholders from the Media button. This is a preset placeholder for the author to add an entire gallery of images.
Add text boxes and utilize Paragraph Styles
Text boxes are automatically ready as placeholders. Simply change the paragraph style and/or formatting.
Build your own photo/video placeholder
Add an image (or screenshot). Select the image and choose: On Mac: Format > Advanced > Define as Media Placeholder
Add pages as desired and distribute to all your budding authors.
I cannot WAIT to see what creative ideas you and your students have when creating books in Pages!
For as long as I can remember, the O'Neill Elementary 4th Grade Nebraska Fair is an exciting opportunity for young learners to begin to develop critical research skills and is a must-see for all parents, grandparents, and community members. My youngest son, Drew, is a 4th grader this year and we eagerly anticipated this memorable project in his academic career.
2016 O'Neill Elementary Nebraska Fair
In the fall I heard about a Roger Wagner product called the Hyperduino from Kelly Croy's Wired Educator podcast. The concept is a combination of a Hyperstudio's multimedia creation software and an Arduino board. With a "Makerspace" feel, this kit allows students to explore principles of STEM with still incorporating physical creation, construction, and design. I immediately knew that Drew would love to incorporate circuits, LEDs, and sensors into whatever physical representation of his Nebraska history project he decided to build. We ordered a kit and eagerly waited for the time of the year that the 4th grade classes began their research.
Drew decided that his topic would be the thing about Nebraska that he loves the most--- Nebraska football-- and quickly got his topic approved by his teachers. The students completed their research questions, fact-finding, and report writing all at school, but parents were encouraged to help students with some sort of display to accompany their project for the Nebraska Fair. This is where the Hyperduino came into play.
The physical model could literally be anything-- the kit actually comes with a small cardboard volcano model and another example video features a solar system model board. (For more ideas, visit the HyperStudio and HyperDuino Central Facebook group.) We decided that a replica of Tom Osborne Field at Memorial Stadium would give us opportunity to connect LEDs and sensors to trigger different multimedia videos that Drew would create to enhance his project. We used a bulletin board, but any kind of cardboard, foam, or display board would work just as well. We knew that we would need to plan and decide:
- number of videos that would be activated by his project
- what the triggers would be for each
- how the LED lights would interact with the videos (when in the videos and where on the board)
- how far apart the Hyperduino connections would stretch to allow us to connect everything to the Hyperduino
Drew and I worked through the example volcano project with little difficulty. We quickly discovered that we didn't even need to learn Hyperstudio to link the media-- that it all could now be done with a free Chrome web app in the Chrome browser. He decided to create 5 videos of his own and use one on the history of Husker football that he found on YouTube. The media that you connect to the Hyperduino can be any YouTube video or website URL which really opens your options for media creation. Drew made three videos with the Explain Everything app and filmed his live tour of Memorial Stadium with the built-in camera and edited in the iMovie app. All videos were uploaded to my YouTube channel and I added them to a playlist, simply for ease of finding later on.
Next we built the physical model of the football field. At the predetermined places Drew and his dad poked holes for the Hyperduino cables and attached LED lights and sensors to them. The Hyperduino is fairly small and can be awkward to access once everything is hooked up, so I used Post-it notes to label each connection with the corresponding number code from the Hyperduino. This made the programming for the Chrome app much more efficient.
We also read about a motor that comes with the kit that you can program to turn. Drew's dad helped him rig up a small hackysack-type football that would spin once we programmed a sensor to do so.
The final, and most important step, was to create the "Playlist" in the HyperDuino for Chrome app that would run the project when launched. While we still are not experts in this, this is how we did it:
1) Loaded the desired video in YouTube.
2) Clicked the + to add new media that is currently open in your browser.
3) Chose the timecode of the video that we wanted to play.
4) Clicked the blue drop-down arrow to set inputs and actions.
This is an example of the sensor connected to the A0 port that is set to Analog mode and will respond from 0 to 255, which means that if the sensor's light is blocked, that it will trigger the playing of the video.
In this second "line of code" the same video is used, but port 9 is set to Output -- High when arriving at timecode 00:13 (light turns ON) and Output -- Low when leaving timecode 00:35 (light turns off).
You can view our final Hyperduino for Chrome Playlist here.
Through trial and error we continued to program the Hyperduino app to interact with our media. The spirit of experimentation is so crucial here. We definitely had more failures along the way than successes, but now feel equipped to build a Hyperduino experience next time that is much improved from our first project. We did figure out how to start a video with a sensor and then make an LED light up at key moments in a video. We got the football to spin (although it did begin to be less dependable after hours of demonstrating to audiences) and added some final labels to the physical project board, just to make the demonstration more self-explanatory. You can view Drew's final project with Hyperduino interactions here:
The Nebraska Fair at O'Neill Elementary was a resounding success and Drew's project was well received by all who visited it. For me personally, it was a great time to experience something as a learner myself, and I cannot wait to pass along the knowledge I gained to the next person who would like to try a similar project. And even more importantly, it was great to learn something new with my 4th grade son.