Students from ESU 8 who attended this year's Nebraska Digital Citizenship Symposium created positive campaigns to take back to their school and community for DigCitWeek 2019.
O'Neill High School
8th grade students from O'Neill High School created the following video PSAs to share with students at both the Elementary and High School buildings.
In addition, this O'Neill High School Digital Citizenship team appeared on Eagle Eye Broadcasting- Daily Announcements during DigCit Week and shared their message.
West Holt High School
7th grade students from West Holt created a social media campaign with graphics shared on their school twitter channel all week long.
Ewing Public School
6th and 7th grade students from Ewing Public School organized a TikTok challenge for Digital Citizenship Week.
Thank you, ESU 8 students, for showing all of us how we can each "Be the One" to make a difference online.
Mrs. Jenny Alder's 4th grade students at Stuart Elementary were kind enough to help me create some monster characters!
Using the brilliant activity from Laura Wright's WrightStuff Interactive, airdropped via Apple Classroom, students got right to work creating unique monster characters in Keynote.
Students from O'Neill High School's Digital Citizenship team created public service announcements to share key take aways learned from the 2018 Digital Citizenship Symposium.
To create, students used this workflow:
1) Choose a topic and write a script (and timed it aloud, ensuring it was 30-60 seconds in length).
2) Decide on visuals and draw on blank Keynote slide with Apple Pencil.
3) Animate the drawing with Keynote's 'Line Draw' animation and export as a movie file.
4) Drop the movie file in a new, blank iMovie project.
5) Voice-over the script and adjust the timing of your line draw animation movie to match.
6) Add background music from GarageBand media library and export the final product!
After creating the PSAs, students shared them during Digital Citizenship Week online (via Twitter), on local radio (KBRX - O'Neill), through Mr. Fisher's "Monday Memo" (all-school weekly update) and on O'Neill High School's Eagle Eye Broadcasting- Daily Announcements show where the students also talked about their important messages.
O'Neill Elementary's 3rd Grade Reading class, under the direction of Mrs. Julie Pistulka along with help from Katie Morrow, ESU 8, recently published their latest version of an annual community history research project. This year, the creative student authors compiled and shared their information in the form of an alphabet book.
Using a Pages template, each "letter" consists of 3 pages:
1) a stanza of poetry and photo gallery on the topic
2) written report from student research
3) student-created artwork
Students added audio narration for all the text with the newest feature of Pages books - Audio Recordings.
Building Word Wizards with Creation Apps (NETA 2018)
Use the power of iPad to transform students into vocabulary wizards in the K-12 classroom. Learn about 10 creation apps that will move your students from consumers to creators and empower them to expand their word wizard skills. Walk away with ideas and apps to use immediately in your classroom. Bring your iPad and create some ‘magic’ along with us.
Last Spring Apple introduced a brand new app that gives us a fun way to build an expressive story. Available for free for all iOS products (iPhone, iPad, etc.) it is simply called Clips.
Why learn a new tool to create digital stories?
Clips allows you to...
avoid the learning curve that you may encounter with many multimedia creation apps
record, edit, and share all on the go (designed for a purely mobile experience)
add a variety of creative filters, overlays, background music and more... all with open usage rights
engage even the youngest of learners with its natural, intuitive workflow
When you launch the app you will see that Clips is designed for immediate recording. There are 3 sources for capturing: video, photos, or pull in anything from your camera roll/Photos Library.
*A big difference from what some of us more traditional video creators might be used to is that you have to hold the red record button for the entire duration of what you want to capture. (For example if you are bringing in a prerecorded video or photo, you have to hold the record button the entire time the video is playing, or you will only add that much to your Clips project.
* TIP:Press and slide to the left on the red record button to lock it in recording mode. This frees up your fingers to interact with your photo or video... for example, pinch to zoom and move it around in the square frame.
The 4 cool buttons at the top allow you to do the following:
1) Live Titles (Your speech will be typed on screen in time with you saying it (like closed captioning)
2) Filters (add fun effects to any part(s) of your video
3) Overlays (Select from pre-made 'stickers', pinch, zoom, rotate, edit text)
4) Posters (Full screen backgrounds with editable text and a bit of included animation)
*The ability to take one photo, zoom in, point and label, zoom out, and create simple, smooth pans truly elevates the media created with Clips above that of a traditional slide show.
Clips always adds new content to the end of your project, but you can easily tap, hold, and drag to move its position anywhere in your 'timeline' across the bottom. Additional editing can include editing the text from your transcribed live titles, muting audio, trimming the ends of each clip, and deleting clips.
One of the most powerful features of Clips when using it the classroom is the background music option. By clicking the music note button in the upper right of Clips, you have access to numerous soundtracks of royalty-free music. Each adjusts to match the timing of your project and even automatically fades in and out depending on pre-existing audio!
Sharing options are numerous and simple. In addition to a variety of social media outlets, each Clips projects can be saved to the camera roll for additional remixing, app smashing, and sharing.
Now, watch a Clips video about a simple project using Clips with kids!
View so many more inspiring ideas by searching the hashtag #ClassroomClips on social media sites such as Twitter, Instagram, and Facebook.
The drawing tools available in Apple's creation apps are simple, yet powerful. Even a non-artistically inclined person can create digital graphics without even leaving the application they are in! Even more importantly, the act of creating infographics can lead to deeper understanding and longer-term learning for students.
Note: Whether demonstrating the drawing tools in Pages, Numbers, Keynote, or even iBooks Author, the process is the same. Use these ideas as starting points. What kinds of lessons do you teach that would lend themselves to students creating information-filled graphics?
First some teaching resources:
Creating Infographics is an excellent learning activity in content areas as well.
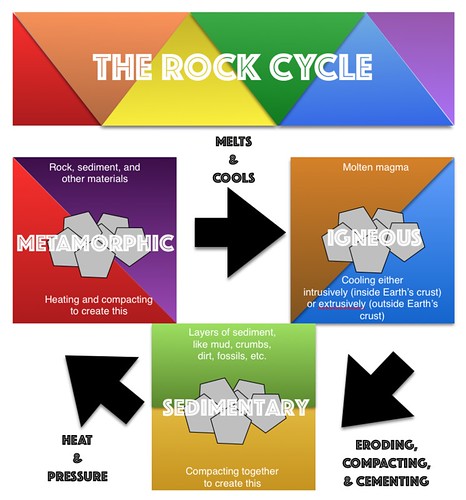
See a few student examples about the Rock Cycle from Kevin Morrow's 8th grade Science class here. Mr. Morrow commented on how visible the student creations made their understanding of the science content he had taught. In addition, he enjoyed the variety and creativity that the project allowed for.
Don't abandon printed projects... just enhance them with technology integration!
This was a driving force in a recent project I had the honor of working on with the West Holt 4th grade classes. Mrs. Shirley Rossman wanted to create a class book to demonstrate their collective knowledge of Nebraska history. And the 150th anniversary of Nebraska's statehood was the perfect backdrop.
Excitingly, she reached out to me looking for ways to infuse digital media into the printed, bound book that she envisioned as a class product. We collaborated to design an augmented reality experience for the reader, where each student's two-page spread could be brought to life with AR.
This was our process:
1. Text development
Students selected their Nebraska topics, researched them, and wrote their text narrative for their page. The pages of the book were mapped out on large classroom posters. To preserve the authentic student-authored look and feel, Mrs. Rossman had each student hand write their text onto one of the page templates to go to the Schoolmate Publishing Company that she had selected to produce the class book.
2. Create trigger images
Students created original artwork to accompany each page of text, again drawing by hand on the book template pages. I used the iPad to take a quick photo of each student's page of artwork so that I could designate each one as a trigger image for the augmented reality we planned to build in.
*Side Note: I applaud the originality and creativity of the students' hand-drawn images. While it would have been easy to find images online or even create them digitally, the authenticity of these students' illustrations makes the book extra special.
3. Create media assets
Each student had the opportunity to create at least one media asset to accentuate their topic. We talked about bringing their research "to life" and trying to enhance the content in a creative, not simply redundant way. This was truly where student choice and voice could shine. App which I demonstrated as suggestions to choose from included:
Chatterpix
Tellagami
Toontastic/Toontastic 3D
Puppet Pals 1&2
WordFoto
iMovie
DoInk Greenscreen
Nearly every app was new to the students but the definitely jumped in and learned quickly! Some student seven created multiple assets that could be selected when readers scanned their image. Mrs. Rossman did a wonderful job of coordinating additional parent volunteers, para professionals' help, and simply workspace on the days we reserved for media production.
We did post all the video assets on a YouTube playlist, just as a secondary way to showcase the students' work and creativity.
4. Blipp-building with Blippar
While Mrs. Rossman sent away the physical pages of the book to be printed and bound, I began working to develop the augmented reality interface.
I selected Blippar as our AR platform because of its reputation with education, in addition to its free price. Teachers can sign up for the Blipp-builder dashboard and create unlimited "blimps" for their classroom, completely for free. Blippar, the app which readers will use to 'scan' the pages, is free as well, and available from both the iTunes and Google Play Store.
While the blimps created with an educational account aren't "public" they can easily be viewed with a simply "campaign code." This is a 5 digit number that users enters into the settings of the app prior to scanning. We put these directions as the pregame page in our book:
The Blippar dashboard asks you to first name your campaign: West Holt 4th Grade NE History Book and then create a blipp for each student by uploading their trigger image.
To add to the interaction, you have several options. The student's media asset can be displayed on initial startup. Or you can add a "button" for the user to tap to initiate the media asset. Sometimes I used generic buttons from the Blippar library, but often I used a custom logo that I created for the project and uploaded to the Blippar library.
Various actions can be accommodated on each tap. Ones we primarily used included:
play video (either uploaded directly to Blippar or linked online)
view image gallery
go to URL
open PDF
Each blipp needs to be saved and published individually, but all can be accessed with the one campaign code in the app.
It seems there is a world of untapped potential to blips-building and I have a feeling that we only scratched the surface with this project!
LEARNING IS A JOURNEY, AND IT IS OUR RESPONSIBILITY TO SHARE THAT STORY. CAPTURE HIGH-QUALITY MEDIA WITH LOW-COST TOOLS. EXPLORE TOOLS AND TECHNIQUES THAT ANY TEACHER CAN USE ANY DAY TO CAPTURE BETTER IMAGES, MAKE MORE POWERFUL MEDIA, AND REACH MORE AUDIENCES. PHOTOGRAPHY, AUDIO RECORDING, VIDEO CAPTURE, EDITING, AND PUBLISHING TIPS WILL BE DEMONSTRATED, ALL WITH DEVICES READILY AVAILABLE IN MOST CLASSROOMS. (from STI 2016)