Showing posts with label #EveryoneCanCreate. Show all posts

Sunday, October 6, 2019

Animal Adaptations Infographics

For this year's ESU 8 Elementary Science Olympiad, activities were centered around a phenomenon. Students were scientists as they explored and experienced topics with connections to that phenomenon.

During my rotation we learned about animal adaptations and how they help animals survive. Each pair of students created an infographic in Keynote on iPad to visually share their scientific knowledge with others.

To replicate in your classroom, I recommend starting with the Everyone Can Create: Drawing guide book from Apple Books. Chapter 9 is all about infographics and contains solid examples as well as planning considerations.
Everyone Can Create Drawing
We also examined this Snowy Owl infographic example to look for critical features of an infographic as referenced in the Everyone Can Create chapter.

Next student pairs each chose an animal that interested them and researched it on World Book Online Student Edition. ESU 8 provides access to this valuable resource to all our schools and it tremendously helped with efficient and responsible research for this age group of students. Older learners could use Advanced and younger grades the Kids Edition of World Book Online. We discussed how to cite and credit the article for their researched and then navigated to the media tab to choose the image to be the center piece of their infographic. Students copied their animal's image and then opened the Keynote app to begin to create.

Prior to students arriving, I used Apple Classroom to distribute a Keynote file where I had created a custom theme with different biome backgrounds set to 50% opacity and locked in the background of the slide design options. This was mostly to maximize time for students to create.

(To make your own version simply create a new Keynote, View > Edit Master Slides, delete the existing masters other than the blank one, duplicate that and add a different background image to each, name each slide master and choose 'Done'.)

Now, all students needed to do was add a new slide (blue + on bottom left) and choose the biome that most closely matched their chosen animal. They pasted their image on the slide, resized and some used instant alpha to clean up the background. (Note: If students had access to Apple Pencil, I would encourage them to trace, color, and delete the original image in order to have a truly personalized look for the visual focus of their infographic.)


Using my example of a deer and its adaptations that I created below, we continued to go back and forth (or use Split Screen view on the iPad) between World Book Web and Keynote in order to add the following components:

  • Title
  • Name of biome
  • Map of where it lives
  • at least 3 adaptations that help it survive


Keynote skills the students learned included:
  • Adding and editing text
  • Inserting drawings
  • Using shapes, callouts, and connectors
  • Recording audio (for a few early finishers)
Also during this fast-paced 45 minute lesson we discussed critical design elements including, font, color, layout (proximity & space), and contrast. 


After all the student groups had rotated through, it was easy to collect the Keynote files through Apple Classroom and send the completed infographics back to their teachers. You can view the students' creativity and scientific knowledge in this online gallery.

Wednesday, August 14, 2019

The Wormhole Challenge

Inspired by creative educators sharing their #WormholeChallenge creations on Twitter, ESU 8 educators got out a little green play doh and tried their own hand at magically revealing something via iMovie green screen capabilities.


While the green/blue screen feature is fairly new to iMovie on iPad, it has been a part of iMovie on Mac for some time. However, it is the approach to this simple green screen project that seems new.  Often we film in front of a stationary green background for effect. But in the Wormhole Challenge, you manipulate the green screen to reveal a pieces of a background a little at a time.

There are so many adaptations for this simple idea, but we used it as a simple ice breaker activity while working with groups of teachers in back-to-school PD. Here are the steps we used to accomplish the goal:

1) Use the built-in camera to record a video of your partner manipulating the green or blue play doh. Change sizes, placement, and even position further and closer to the iPad camera.

2) Open a new blank iMovie video project.

3) FIRST, add your background image (or video). In other words, what you plan to reveal.

4) SECOND, add your video of the hands manipulating the green blob.

  • if using iPad: 
With your playhead at the beginning of your project, use the + to add the Video from your 'Recently Added' album. Once selected, use the ellipsis to select "Green/Blue Screen" from the options. Finally, don't forget to tap on the part of the video in the viewer that you want iMovie to "key" out (green, blue, or some other color you want to become invisible!).


  • if using Mac:
Drag your green screen video clip just ABOVE your background clip in your timeline. Then, click the Video Overlay settings button and change the dropdown menu from 'Cutaway' to 'Green/Blue Screen'. That's it! iMovie will automatically find the green or blue color here. (You can, however, do some adjusting and editing if need be.)


Amazingly, that is all there is to it! No need for additional software, apps, or extensive editing experience. Now, what will you magically reveal in your next Wormhole Challenge project?


Wednesday, November 21, 2018

Live Loops Lexicon: A vocabulary lesson with GarageBand


For 5th and 6th graders this was their first exposure to GarageBand. As we didn't have enough time for them to work through the Everyone Can Create Music book in its entirety, I gave a brief overview of how Live Loops worked and let them experience the power of music creation via discovery mode. 

Then they randomly selected words from a "power words" vocabulary list I pre-made. Their task was to create a "Live Loops Lexicon" where the feel of the music helped bring to life the meaning of the word. After their 30-60 seconds of music was created and captured, they added a microphone track and voice recorded their word, its definition, and usage in an original sentence. 

Alternately named "Lingo Jingles" this was a simple activity that introduced students to the power of creating music with GarageBand, while at the same time broadening their vocabulary!


Student Examples:


Monday, September 3, 2018

Students Authoring Books with Pages


Every year on September 8, International Literacy Day is celebrated. In conjunction with this year's celebration, AppleEDU has launched a #PagesBookChallenge. The challenge is simple. Create a digital book with your students in Apple's Pages app (free creation app for Mac or iPad). Then, simply tweet a short synopsis of the book along with its cover and tag #PagesBookChallenge.


To encourage all educators to participate here a series of short tips and recommendations for creating digital books with Pages.

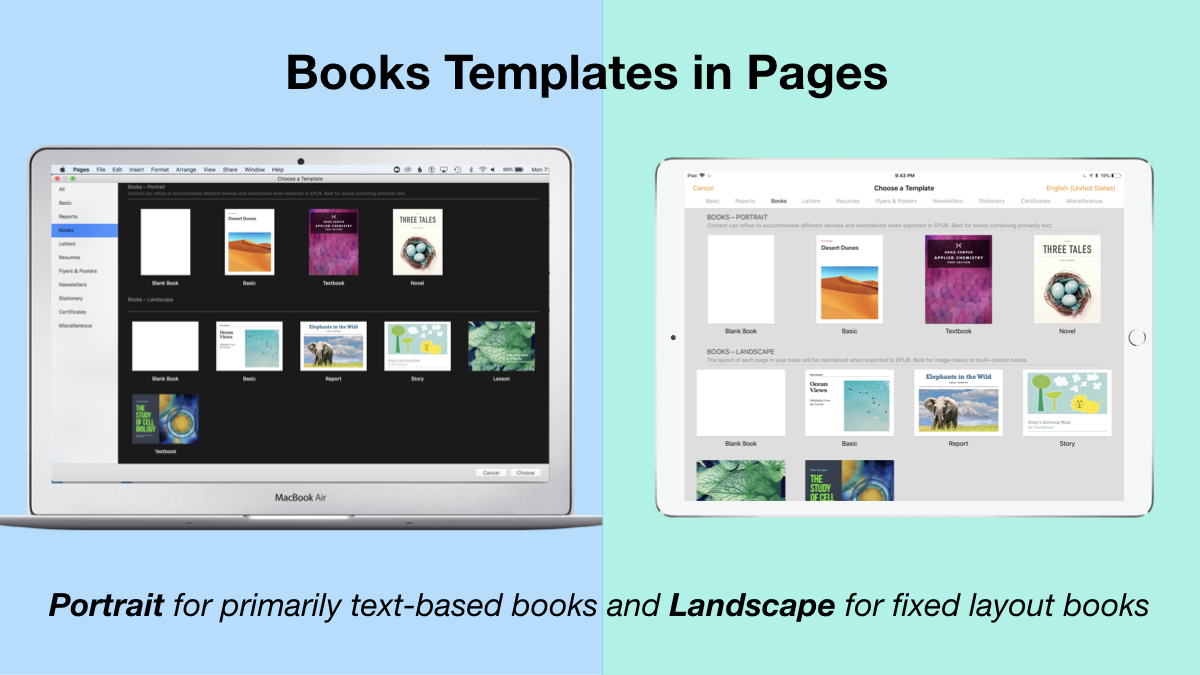
1. Begin a new Pages project using the Books templates.

Tip: Use Portrait templates for primarily text-based books (so that the reader can resize the text and the pages will adjust accordingly) and Landscape for fixed layout books (where you control the exact design and layout of the pages and the reader cannot adjust).

2. Author and Edit as you normally would in the Pages app. 

The beauty of the iWork suite, in my opinion, is its simplicity and consistency across apps. Unleash your creativity!

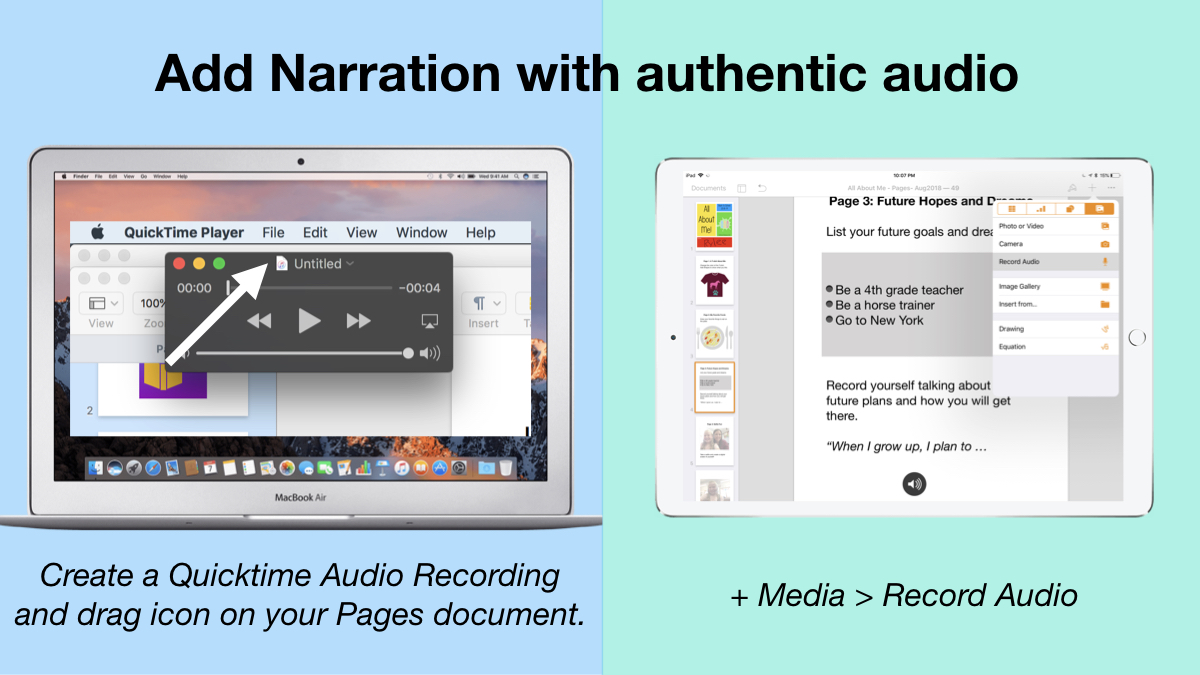
3. Add narration with authentic audio

On Mac: Create a Quicktime Audio Recording and drag icon next to filename onto your Pages document.
On iPad: Tap the +, choose the Media tab, and Record Audio, then add to page.

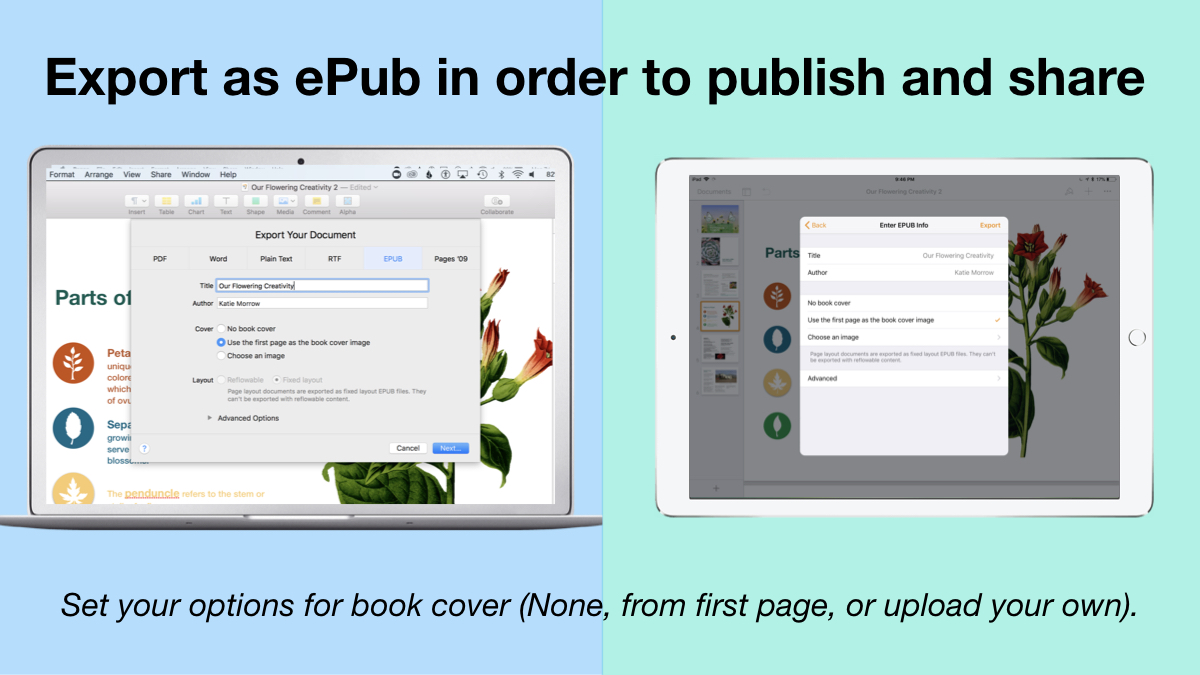
4. Export as ePub for Publishing and Sharing.

Title your book and name the author. Set your options for book cover: (None, from first page, or upload your own).
There you have it! Anyone can create a book with Pages. 


 Student books authored in Pages by Mrs. Troester's English 8 class, Spring 2018. (Science "Explainer" books for younger learners)

As educators the possibilities are endless when authoring books with Pages. To help learners experience authentic authoring, encourage them to work through all stages of the writing process. Here is a 60 second reminder of how to do so within the Apple ecosystem.


Finally, teachers can use Pages templates to help students focus more on the content of their books, and less on the the design of the pages. Whether for professional learning experiences, class books where every student authors a piece, or even shorter individual writing projects, simply create a Pages book as a starting template. Share the Pages document as a starting point and allow the learners to customize the content. Be sure to take advantage of the following features:

Media placeholders

Add image gallery placeholders from the Media button. This is a preset placeholder for the author to add an entire gallery of images.

Add text boxes and utilize Paragraph Styles

Text boxes are automatically ready as placeholders. Simply change the paragraph style and/or formatting.

Build your own photo/video placeholder

Add an image (or screenshot). Select the image and choose:
On Mac: Format > Advanced > Define as Media Placeholder

Add pages as desired and distribute to all your budding authors.  

I cannot WAIT to see what creative ideas you and your students have when creating books in Pages!


Friday, August 31, 2018

4 Types of Sentences... Zoom Clues in Clips!

Shirley Rossman, 4th grade teacher at West Holt Elementary, just finished teaching her students about the four types of sentences. In order to reinforce these key concepts, she had the idea to adapt the concept of "Zoom Clues" videos made in Apple's Clips app and challenge her students to demonstrate mastery.

Here is the project workflow:

  1. Students choose a "mystery object" and author FOUR sentences (one of each of the four sentence types: declarative, imperative, interrogative, and exclamatory) giving clues about the object's identity. 
  2. Students take a photo of their chosen mystery object with the iPad camera. The image should be fairly close up, but show the entire object, as this will be the view shared as the "answer" to the Zoom Clues video. 
  3. Students start a new project in Clips and add a poster image to introduce their video.
  4. From the Library, bring the photo of the mystery object into the "stage." Pinch to zoom in as far  as possible, and position the image in a way that guessing the object could be challenging. Add a label with the first clue and press the big red record button to add to the Clips project. 
  5. Zoom out just a little and/or change the viewpoint, add the second sentence clue with a new label, and record the clip. 
  6. Repeat for the last two sentence clues. 
  7. Add a conclusion slide that shows and reveals the answer.
  8. Add music and export the final video to share it!

Here is a sample "4 Types of Sentences Zoom Clues" that the West Holt 4th graders and I quickly made together, but hopefully soon they will share some more clever examples of student creativity! Check back soon!


Monday, July 30, 2018

Getting to Know Your Students: Back to School Activity Ideas with Keynote Shapes

Many teachers may remember the brilliant "All About Me" project shared on the Apple Teacher Learning Center.

In it, students use the Shapes Library in Keynote in creative ways to share all about themselves.

This is a wonderfully simple and adaptable activity for those first days back to school.

Below I have shared some additional prompts for a similar "Getting to Know You" activity.

You can download the Keynote file (for Mac or iPad) and adapt it even further here:
Getting to Know Students- Shape Collages_blank template for Keynote

Or see some finished examples for additional inspiration.

How do you plan to use and customize the incredible Shapes Library in Keynote to get to know your students this school year?