Whether you are familiar with Challenge Based Learning (CBL) or not, the time is ripe for newly updated resources surrounding this student-centered learning framework.
Our students are eager for meaningful, applicable learning experiences and CBL provides just the right amount of scaffolding to impact any classroom or campus.
This resource is jam-packed with insight. From the history and foundational thinking of CBL, to a simplified 3 stage process, to connections other pedagogical approaches- each page adds exciting knowledge to any educator's expertise.
Also, be sure to explore the newly updated CBL website, shared by Digital Promise at http://cbl.digitalpromise.org. In addition to the rich resources here, registration is currently open for a global challenge based on the United Nations Sustainable Development Goals.
What an exciting time to be an educator! Join the hundreds of thousands of teachers and schools who have already seen the impact of CBL on their students and communities. Join the #CBLWorld movement today.
Another NETA Conference is officially in the books, but as always, the learning doesn't stop at the Century Link Center. Here is a quick collection of how my time was spent learning this year at NETA 2016.
I presented three sessions this year and have linked the slides and resources for each.
Learn about the process of publishing on the iBooks Store from start to finish including topic and project ideas for both teachers and students, content development in iBooks Author, and the submission and approval process from iTunes. Whether for classroom use or personal professional use, anyone has the ability to become a published author on this powerful platform!
If you thought Keynote was simply used to create slideshows, you will be amazed! See creative ideas for alternative uses of Apple's Keynote app for either Mac or iOS. Coding, animation, holograms and more... and all experiences are easy enough for beginning users. Learn and apply innovative ideas to do more with something you already have access to: Apple's Keynote.
Learn about lessons for education gained from my personal experiences playing a TV Game Show - Family Feud! Google slides with notes: https://goo.gl/R7aJRU
As always, the NETA Keynotes were first-rate. This year they featured "NebEdTalks" - shorter style Nebraska Education "TED Talks" - from 4 different presenters. Leading off was Bob Dillon, Director of BrightBytes Institute who reminded us to slow down, notice and appreciate more.
Jennie Mageira, however, encouraged us to get motivated to let go and take risks with her talk centered around "Courageous Edventures."
Day 2 Keynotes included Rafranz Davis on Diversity in Education and Nebraska native, Tony Vincent, who encouraged us to "Reset the Presets."
For me professionally, there were too many valuable sessions to even begin to list. However I did see many common themes. Over and over again, we were reminded in the power of failure- both for our learners and for ourselves professionally. "Play" and gamification, both in teaching and in PD were repeated frequently. Google Cardboard and the MakerSpace/Maker movement were also a common interest for participants. Blended Learning continues to be an important topic for schools as well, and NETA provided numerous sessions and resources for it.
Additional personal highlights for me came from secondary experiences related to NETA. I participated in a BreakoutEDU session and thoroughly enjoyed the collaborative challenge of breaking out of Dr. Johnson's Lab. The educational opportunities that exist with this concept excite me for schools. Learn more at breakoutedu.com.
NETA also sponsored its first ever 5K fun run/walk. We woke up early on Friday morning to take a short run across the bridge into Iowa with fellow NETA participants. Again, sometimes it is the peripheral experiences that provide the richest learning opportunities.
To follow some of the many tweets from #NETA16, check out this Twitter archive - rich with links and commentary.
Lynch, Nebraska, population 236 (2013 census) to me has always been the epitome of rural community pride. It is home to thriving businesses, genuine people, and a great getaway for anyone desiring a break from the beaten path.
Lynch Public School continues to try and push the envelope with technology amidst the realities of declining population, waning financial support, and public opinion encouraging consolidation or closure.
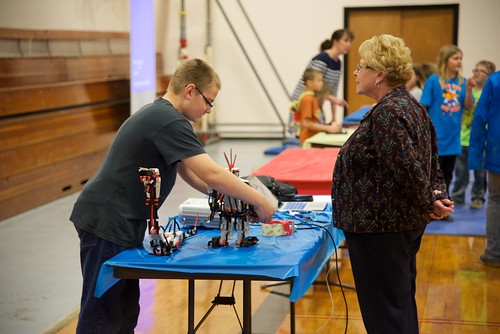
During the current school year Lynch Public School set a goal to host a Technology Fair with the intent of showcasing technology usage across the K-12 school. Efforts began early, and by partnering with ESU 8, teachers were provided related training and ongoing support. Teachers chose a variety of projects and tech skills to implement in their classrooms and subject areas. Plans were shared across the staff so that duplicate ideas were avoided and a wide variety of exemplars could be showcased.
For the Tech Fair each teacher hosted a “booth.” All students were encouraged to attend and demonstrate technology skills they had gained from their classroom experiences. The entire community was invited to attend, and like any good open house, refreshments were served. :-)
On their own initiative the staff worked together to create a plan for the delivery of the experience, open to the public. They set up projector screens back to back in the middle of the gym and positioned additional tables around the outside edges of the gym. Every available projector from a classroom was moved to a table station. Some stations required speakers and/or headphones, while others just required iPads or laptops to demonstrate.
Click the above image to view the Flickr album of photos from the event.
Some of the high level student work that was shared included:
iMovies of classroom activities (“A Day in the Life”)
Instructional videos (PE and Industrial Tech skills)
Augmented Reality projects (“About Me” and science…)
Robotics
iXL Math
Kahoot online quiz games
Digital books created with iBooks Author (World War II)
Digital books created on iPad with Book Creator app (Weather Instruments)
20% Project Presentations (student-directed scientific research projects)
Green screen videos (music videos and more!)
Online portfolios (Art portfolios built with Smore)
SMART Board activities in English Language Arts
Learning journals with the SeeSaw app
Sketchup (3D design)
The event was well attended. Many parents, grandparents, and additional family members were treated to a more in-depth personal exposure to each student’s learning experiences with technology. Another positive outcome was the visitors who were not necessarily relatives of the students, but simply interested community patrons. To be able to demonstrate the value of tax payers’ money and the purposeful impact the school is making for youth is an absolute win-win for all.
I have often said that it is our personal responsibility as educators to promote the positive things that are happening in our classrooms. Lynch Public School took on this task and more with their collective efforts around the Tech Fair. They proved once again that no matter your school’s size, you can be an example to others— an example that I hope to see others following in the near future. Whether through online spaces, in the media, or simply inviting the community in for an experience like a Technology Fair, we all can be advocates for technology-enhanced education through the power of public sharing.
For as long as I can remember, the O'Neill Elementary 4th Grade Nebraska Fair is an exciting opportunity for young learners to begin to develop critical research skills and is a must-see for all parents, grandparents, and community members. My youngest son, Drew, is a 4th grader this year and we eagerly anticipated this memorable project in his academic career.
2016 O'Neill Elementary Nebraska Fair
In the fall I heard about a Roger Wagner product called the Hyperduino from Kelly Croy's Wired Educator podcast. The concept is a combination of a Hyperstudio's multimedia creation software and an Arduino board. With a "Makerspace" feel, this kit allows students to explore principles of STEM with still incorporating physical creation, construction, and design. I immediately knew that Drew would love to incorporate circuits, LEDs, and sensors into whatever physical representation of his Nebraska history project he decided to build. We ordered a kit and eagerly waited for the time of the year that the 4th grade classes began their research.
Drew decided that his topic would be the thing about Nebraska that he loves the most--- Nebraska football-- and quickly got his topic approved by his teachers. The students completed their research questions, fact-finding, and report writing all at school, but parents were encouraged to help students with some sort of display to accompany their project for the Nebraska Fair. This is where the Hyperduino came into play.
The physical model could literally be anything-- the kit actually comes with a small cardboard volcano model and another example video features a solar system model board. (For more ideas, visit the HyperStudio and HyperDuino Central Facebook group.) We decided that a replica of Tom Osborne Field at Memorial Stadium would give us opportunity to connect LEDs and sensors to trigger different multimedia videos that Drew would create to enhance his project. We used a bulletin board, but any kind of cardboard, foam, or display board would work just as well. We knew that we would need to plan and decide:
- number of videos that would be activated by his project
- what the triggers would be for each
- how the LED lights would interact with the videos (when in the videos and where on the board)
- how far apart the Hyperduino connections would stretch to allow us to connect everything to the Hyperduino
Drew and I worked through the example volcano project with little difficulty. We quickly discovered that we didn't even need to learn Hyperstudio to link the media-- that it all could now be done with a free Chrome web app in the Chrome browser. He decided to create 5 videos of his own and use one on the history of Husker football that he found on YouTube. The media that you connect to the Hyperduino can be any YouTube video or website URL which really opens your options for media creation. Drew made three videos with the Explain Everything app and filmed his live tour of Memorial Stadium with the built-in camera and edited in the iMovie app. All videos were uploaded to my YouTube channel and I added them to a playlist, simply for ease of finding later on.
Next we built the physical model of the football field. At the predetermined places Drew and his dad poked holes for the Hyperduino cables and attached LED lights and sensors to them. The Hyperduino is fairly small and can be awkward to access once everything is hooked up, so I used Post-it notes to label each connection with the corresponding number code from the Hyperduino. This made the programming for the Chrome app much more efficient.
We also read about a motor that comes with the kit that you can program to turn. Drew's dad helped him rig up a small hackysack-type football that would spin once we programmed a sensor to do so.
The final, and most important step, was to create the "Playlist" in the HyperDuino for Chrome app that would run the project when launched. While we still are not experts in this, this is how we did it:
1) Loaded the desired video in YouTube.
2) Clicked the + to add new media that is currently open in your browser.
3) Chose the timecode of the video that we wanted to play.
4) Clicked the blue drop-down arrow to set inputs and actions.
This is an example of the sensor connected to the A0 port that is set to Analog mode and will respond from 0 to 255, which means that if the sensor's light is blocked, that it will trigger the playing of the video.
In this second "line of code" the same video is used, but port 9 is set to Output -- High when arriving at timecode 00:13 (light turns ON) and Output -- Low when leaving timecode 00:35 (light turns off).
You can view our final Hyperduino for Chrome Playlist here.
Through trial and error we continued to program the Hyperduino app to interact with our media. The spirit of experimentation is so crucial here. We definitely had more failures along the way than successes, but now feel equipped to build a Hyperduino experience next time that is much improved from our first project. We did figure out how to start a video with a sensor and then make an LED light up at key moments in a video. We got the football to spin (although it did begin to be less dependable after hours of demonstrating to audiences) and added some final labels to the physical project board, just to make the demonstration more self-explanatory. You can view Drew's final project with Hyperduino interactions here:
The Nebraska Fair at O'Neill Elementary was a resounding success and Drew's project was well received by all who visited it. For me personally, it was a great time to experience something as a learner myself, and I cannot wait to pass along the knowledge I gained to the next person who would like to try a similar project. And even more importantly, it was great to learn something new with my 4th grade son.
The following are some simple ideas for teaching poetry writing lessons with iPad apps. All apps are free, unless otherwise noted.
Rhyming Poetry
Try the Rhymer's Block app to create a new piece of rhyming poetry. Use the Prime Rhyme app or the RhymeZone website as a reference to find rhyming possibilities.
Another great introduction to poetic forms is creating a name poem. Here is one online generator to quickly prompt this kind of poetry. Also consider trying this Name Poem app.
Found Poems
"Found Poems" are formed by finding words within prose and reassembling them in order to form a new poem. Students can use an app such as FridgePoems to practice reassembling random or suggested words. Then take a piece of prose (a famous speech or passage from an essay, for example) and create a found poem with the Word Mover app.
Point-of-View, Personification, or Persona Poems
Chatterpix app- Students write a poem in first-person point of view. They then take a photo of the “narrator” (it could be an inanimate object or a historical person or a photo of anything they find online). In the Chatterpix app they draw on where the “mouth” is and then record themselves reading their poem, making the photo come to life and look like it is speaking. Alternatively, they could use an app such as PhotoSpeak if their poem lasts longer than 30 seconds.
Oral Fluency Poetry Reading
GarageBand app- Students record an oral version of any poem they author, reading with expression of course! Export the audio recordings with Share > Export Song to Disk and then collect all students’ poems in a playlist, Google Drive folder, or put on a website for others to listen to.
Illustrating Poetry
Use a drawing app like Doodlebuddy or Paper by 53 and have students create a Sketchnote of their poem. Alternately, even simply illustrating an image to go along with their poem would have value.
Syllable Structure Poems
Use this teacher-created guide for iBooks to expose students to some poetry formats with set syllable structures (including haiku, senryu, tanka, and cinquain) and then use an app like Haiku Poem to create their own.
Concrete Poetry
Students create a concrete poem built out of the shape of their words. A favorite app for this type of poetry creation is TypeDrawing, however it is a paid app. Another option (also not free) is the app Path On.
Diamante Poems
Use the Diamante Poem app from ReadWriteThink to create this diamond-shaped, set structure poem.
Poetic Symbols
Use the Adobe Voice app and bring poetry to life with the images in the app's symbol library. Add your poem with a voice over and you easily have a finished multimedia project. Note: the student example below is not necessarily a poem, but gives you an idea of how simple to use the app is.
Poetry Video Remix
Create an iMovie from a published poetic work. The following example created by students is a interpretive remix of the poem "Nothing Gold Can Stay."
Figurative Language
Find examples of figurative language in modern day song (like the example below, created by students with the Keynote app), in books, or other existing works. Students can create a compilation of figurative language examples or simply author their own.
Additional iPad apps for exploring poetry with students:
2nd and 3rd graders in Ms. Mather's Science class at Lynch Public School have been becoming weather experts. They decided to show what they have learned about scientific instruments by creating eBooks with one of my favorite apps: Book Creator. Here is a simple overview of their successful iPad learning adventure as well as easy extension ideas for additional application.
Photographing the weather while staying warm!
Building Background Knowledge
Ms. Mather and her class learned about Weather. Some great digital resources include "Weather" from World Book Kids and several videos from Learn 360 - both available through your ESU 8 Media Center access.
Ms. Mather decided that "weather instruments" would be a good focus and structure for the students' digital project.
Each student created a paper book detailed 8 scientific instruments used to study weather. Each page included the instrument name, picture, and student-created sentence.
Book Creator Basics
I shared an example of a student-authored Book Creator book, "A Dream Come True" (by Drew and Claire Morrow)
Then I showed them how to get started with a new Book Creator project and we discussed opportunities for creative content to go into their pages.
Weather Examples in iBooks
Next we looked at a couple of published examples by students in the iBooks Store including:
Students quickly and easily navigated to the Book Creator app on their iPads and got started. Even with the free version of the app, students can completely author and publish one entire book. Plans to upgrade to the $4.99 paid version were quickly made and easily jus
tified for future projects.
Each page followed a pattern, and every page had a plan (in the students' paper books) and so students could concentrate on the creative side of publishing, maximizing their technology time.
For each page's images, students could choose whether to draw the weather instrument, take a photo using their iPad's camera, or find a photograph of the instrument online. Students were encouraged to use photosforclass.com for copyright-friendly images for their books.
iPads allowed for differentiation. Some students were encouraged to add in a page about each weather instrument with either a photo or video of the student using it.
All students were encouraged to record all of their book's sentences as audio recordings on each page. We discussed how valuable this would be for someone who is blind, who doesn't yet know how to read, or even for guests at an upcoming technology fair.
Students excited to discover scientific instruments emojis!
Decisions for Delivery
Format (individual or group-authored)
Topics (jigsaw ideas, common outline, uniform topics)
Required Components (text + audio recordings of all text, photos or drawings, video)
Title (and covers)
Extension Options
Along with the students' study of weather instruments, this project would work well with creating a class weather forecast (using iMovie or DoInk and a green screen).
A global learning opportunity would be to ask each student to survey and collect data/images of the weather around the world. After analyzing or mapping the results students could explain what they learned in their digital books.
Obviously, any topic could easily be interchanged with "weather" and used for an equally successful project.
Transfer of analog to digital
Don't underestimate the power of publishing to the iBooks Store. Although these students plan to share within their school community and with the guests who come to their Technology Fair, they could also elevate their work to a global audience by leveraging the iBooks Store platform.
The weather kindly cooperated by gently snowing making for some great images for the students' books
What is the weather like in your part of the world? Using Google Earth
Friday, February 12, 2016 was a career exploration day at Madison Public School, and I was lucky to be invited to participate. Every student in grades 9-12 rotated through eight different sessions with professionals sharing about their chosen career path. The day was designed by Karla Kush, Guidance Counselor and Jim Crill, HS Principal, and Madison has done variations of the experience several times in the past. What a great opportunity for students to link purpose for what they are doing in school and discover many different options for professional ambitions!
Guest speakers at Madison Public School's Career Day, February 12, 2016
In each of the 8 rotations, students were tasked with completing a "Career Report" which not only helped guide the discussions, but also helped students make connections to their personal goals.
I began by sharing a brief story of my journey to getting to my current professional role.
Next, I talked about some of my experiences through the SMART Exemplary Educator, Google Certified Teacher, and Apple Distinguished Educator programs, and what leading technology companies today are looking for in future employees. Instead of seeking "clicking skills," software expertise, or even GPA, it is more important to have innovative ideas and the ability to prove yourself as a self-directed learner.
I encouraged students to open their minds to additional opportunities that exist within the fields of educational technology. When I think about all the "jobs" that I have had even as "just a teacher" it is really mind-boggling. In education you can not only be a teacher, but a writer, presenter/speaker, leader/administrator, coach, counselor, media specialist, tutor, curriculum developer, and teach online classes. In the field of technology I have had experiences with web design, coding, network & systems administration, social media, animation, graphic design, and multimedia creation, just to name a few. The possibilities are truly endless, if students are willing to approach the career with an open mindset and be willing to continually keep learning.
And to do so, there is no time better than the present. I concluded by sharing three valuable tools/tips for pursuing any profession or career, even while they are still in high school.
1) Get motivated by TED Talks and see others' inspiring ideas take shape into action. Follow their lead or apply to your own passions.
2) Learn anything, anytime, anywhere with iTunes U. Don't limit yourself to the classes you take or what your teachers know.
3) Be intentional about building a positive digital footprint-- starting right now. Make yourself "google-able" and build a personal brand for yourself that showcases your talents, skills, and interests. Start a blog or build an about.me page.
We had great discussions with high school students about the exciting times we live in and the opportunities for all to follow their dreams. Thank you, Madison Public Schools, for the chance to share my excitement for the field of educational technology with your bright youth!